Pinterest

Follow Me on Pinterest

Saturday, December 25, 2010

12 Days of DIY :: Day 12 :: Gold and Silver Leaf Champagne Glasses

Merry Christmas!! 

Today is our final DIY project in our "12 Days of DIY". It's a fun project to add some flair to your champagne glasses for New Year's! Add some sparkle to each glass by stenciling different gold leaf (or silver leaf) designs! This project comes from Design*Sponge and is quite easy to pull off! I hope you've all enjoyed the projects we've shared this year. Have a Merry Christmas and a Happy New Year! See you in 2011!


Materials
*You can buy a full kit of supplies here for $19. It will last you for many rounds of glasses.*

Instructions:

1. Clean your classes with soap and water and dry thoroughly.
2. Using your paintbrush, dab a SMALL amount of liquid adhesive on your brush to create a shape or pattern. If you’re doing a longer design, be sure to move quickly because the line will disappear as the glue starts to dry.


3. Let dry for 20–30 minutes. (Don’t worry if you can’t see the glue; it’s still there and sticky.)
4. Carefully take out a sheet of your gold or silver leaf and gently place it on top of your glue pattern/shape. Dab with your fingers until the leaf fully adheres to the glue shape. You can use a soft cloth or sponge to gently press the leaf into the glue.


5. Gently brush away the excess leafing until the shape you’ve drawn is left.

6. Using a clean paintbrush, coat the portion of your glass covered in gold/silver leaf with the leaf sealant (the sealant will dry clear). The design will not be waterproof until it’s coated. Allow the sealant to fully dry, and you’re ready to go!


Note: These are not dishwasher safe. They will be waterproof and safe to drink with, but you’ll want to wash them gently by hand.

See the full post and instructions at Design*Sponge.

Friday, December 24, 2010

12 Days of DIY :: Day 11 :: Glittery Christmas Tree

I love anything that adds some sparkle to your party, and these glittery Christmas trees do just that! They can be made in literally ANY color you want, making non-traditional holiday decorating easy. (I do love the traditional stuff, but I realized this year that I was tired of the red & green. I'm thinking next year will be purple or teal and silver!) Check out this crafty project from Catch My Party and try it out yourself! 

Bonus: These can also be used to add some sparkle to a New Year's Party!


Supplies:
  • 3 styrofoam trees: I used sizes, 15×5, 12×4 and 9×4, but you can use any size you want.
  • 3 small candlesticks. I found these at Michaels for $1.00
  • Spray adhesive
  • Elmer’s glue for the glitter on the bottom and a stronger epoxy like glue ( I used E6000) to glue the tree to the candlesticks
  • Glitter in any colors you LOVE
  • White spray paint
Instructions:
  • Give your tree a good coating of the spray adhesive. It dries pretty fast so you won’t have to wait too too long. Leave the bottom of the tree undone, you will glitter this at the end.
  • Once you have your tree coated in glue, cover it completely with the glitter. Do this for all three trees and then set them aside to dry.


  • While they are drying, you can spray paint your candlesticks. Let those dry. I even saw pretty silver candlesticks. That would look cool to just leave them silver.
  • Now take your E6000 and glue the candlesticks to the trees. Let them sit overnight. They have to be really good and dry.
  • When everything is good and dry, flip them over and put a little Elmer’s glue on the bottom around where the tree is glued to the candlestick. Glitter this.


  • You are done! Find the perfect spot for these and wait for all the compliments. They are so pretty that I had several people not believe I made them! 

See the full post on Catch My Party

Thursday, December 23, 2010

12 Days of DIY :: Day 10 :: Ornament Garlands

This is a simple yet gorgeous way to accent a tree, a mantle, a doorway, or any other space where you can hang a garland. Few supplies are needed for this glamorous effect! I think I'm heading down to the basement after this post to dig out some old ornaments and beads! My mantle could use a few strands of these...


Materials
  • plastic-beaded garland
  • ornaments (the kind with the detachable metal cap)


To attach an ornament to the garland, gently pull the metal cap from the ornament and separate the wire loop from the cap. Place the cap back on the ornament. Slip the wire loop around the garland and, pinching the wire ends together, insert them through the cap on the top of the ornament so that they spring open inside of it and hold it in place.


See the full guest post from David Stark Designs on Design*Sponge

Wednesday, December 22, 2010

12 Days of DIY :: Day 9 :: Two Toned Gift Wrapping

I had a lunch today with a group of fabulous ladies, and we did a gift exchange that I took a gift for. I wanted to make sure my gift was beautifully wrapped, so I called upon my blog list for wrapping ideas! I came across this post from One Charming Party and decided to try it. It's so easy, and you can use up those mismatched pieces of wrapping paper that you've been saving up....


I think everyone has this problem at some time or other. You are wrapping a present and you run out of wrapping paper. This happens a lot when I wrap big boxes. Here is a great trick for covering large boxes or using up leftover scraps. Try the two-toned gift. Wrap half of your present with one kind of paper and the the other half with another kind. Then cover the seam with a pretty ribbon. Viola! This is also great for when you have reversible wrapping paper and can’t decide which side you like better. Happy wrapping. (from One Charming Party)

Here's my gift that I wrapped today!


12 Days of DIY :: Day 8 :: Gingerbread Martini Jelly Shot

Today's DIY project is of the yummy edible variety! If you're having a holiday gathering, or if you just want to make your holiday at home a little more fun, try these delicious holiday "edible cocktails" from Jelly Shot Test Kitchen. Don't they look festive??


Ingredients:
  • 1/3 cup Monin Gingerbread syrup
  • 3 tbsp water
  • 3 tbsp sweetened condensed milk
  • 2 1/2 envelopes Knox gelatin (1/2 envelope equals about 1 tsp of gelatin powder)
  • 1/2 cup vanilla vodka
  • 1/2 cup Baileys Irish Creme liqueur
  • 1/3 cup Kahlua coffee flavoured liqueur
  • Whipped topping and maraschino cherry segments for garnish, if desired
Instructions:

Pour gingerbread syrup, water, and sweetened condensed milk into a small saucepan and sprinkle with gelatin.  Allow to soak for a minute or two.  Heat over low heat until gelatin is fully dissolved, about 5 minutes.  Mixture will be a bit thick.  When gelatin is dissolved, remove from heat.  Mix in the vodka first, then the Bailey’s and Kahlua, stirring well after to each addition to fully incorporate.  Strain to remove any un-dissolved gelatin solids. 

Pour into molds or pan.  Chill until fully set, several hours or overnight. 

To serve, unmold or cut into desired shapes.  Immediately before serving, garnish each jelly shot with a little whipped topping and a maraschino cherry segment. 

Makes 18 to 24 jelly shots.  


Unmolding Tips (metal mold):
  • Allow gelatin to set until completely firm, preferably overnight.
  • Before attempting to unmold, loosen the edges of the gelatin by pulling gently either with a clean fingertip or a knife dipped in warm water to loosen. 
  •  Dip mold in warm water, just to rim, for 10 seconds (Don't dip for too long, as jelly shots can get a bit melty, losing the crisp detail of the mold.  If this happens, don't worry!  Just return the mold to the refrigerator for 20-30 minutes and try again!)  
  •  Lift mold from water and gently pull gelatin from edge of mold with moist fingers. Invert the mold onto a nonstick cookie sheet, and give it a little shake.  Repeat the pulling, inverting and shaking process until all the jelly shots have been removed from the pan.  
See the full post and find more delicious jelly shots at Jelly Shot Test Kitchen.

Tuesday, December 21, 2010

12 Days of DIY :: Day 7 :: Ice Bottle Cooler

A genius idea to keep beverages cold in a decorative and eye-catching way! These ice bottle coolers can be used for liquor, wine, or even non-alcoholic drinks such as lemonade or tea.
 
Supplies:
  •  A 3-liter empty soda container that you will cut the top off of
  • distilled water for more clarity in your end result 
  • fruit such as lemons, limes, star fruit, or cranberries
  • duct tape - only in case your bottle floats up in the water 
Instructions:
 
Place the bottle of vodka inside the 3-liter container and fill with an inch or two of the distilled water - freeze until solid.
When the base is frozen you can begin adding slice fruit or berries around the bottle and fill with more water to just cover the fruit layer - freeze until solid.
 
Once the first fruit layer is frozen you can add your next layer in the same manner, filling with distilled water enough to cover the fruit.  This layer should take you to the top of the vodka bottle - freeze until solid.
Once the cooler is frozen, take it out of the freezer so it can thaw slightly - enough to work the 3-liter container off of the ice (about 30 minutes).  You may still need to dip in luke warm water to help ease it off.  Once you have the ice cooler out of the container store it in the freezer until ready to set on your bar.

Tips:
When setting the ice cooler out on your bar, set it in a shallow dish or tray that is lined with a small towel. This will prevent the icy base from slipping around on the dish, as well as help contain the melting ice.  Under normal home temperatures this should last a few hours. 

If you would like to use the ice cooler for white wine or other cold drink, just insert an empty bottle (wine bottle or other decorative bottle) into the 3-liter container and follow the same steps.  You can add your beverage to the empty bottle inside (using a funnel) after the cooler is frozen.

See the original post for this fabulous idea at Celebrations at Home.

Sunday, December 19, 2010

Congrats Marge & Henry

We helped Marge & Henry celebrate their 20th wedding anniversary on December 4th (actual anniversary date was December 7th). With the help of Marge's son and daughter-in-law in Cincinnati, we planned a holiday gathering for 80 guests at the Lake House in Avon Lake. We brought in white chairs, chair covers, banquet tables, white linens, and we set the tables and coordinated the event. Marge's daughter-in-law, Tracee, hand painted wine glasses for each guest to take home as a favor!


La Campagna in Westlake brought in a wonderful catered lunch, live music was played for the guests by John Kowalski, Marge & Henry's daughters gave a presentation of fun family history and played trivia with the guests to hand out holiday gifts. Also on hand was a DVD copy of their wedding, which played on the television throughout the afternoon. The cherry to top it all off was the dessert...dozens and DOZENS of cupcakes from Sugar Cupcakery, which came all the way up from Cincinnati (Milford). So delicious! 


It was a beautiful day and a touching event for such a sweet couple. It was a wonderful experience working with this loving (and large!) family. Best wishes to Marge and Henry for many more years of happiness!

On a side not, Sugar Cupcakery is going to be featured on Cupcake Wars on Food Network! Their episode will air on June 13, 2011. For more information visit foodnetwork.com/cupcake-wars.

Setting Your Holiday Table

I can't wait for our Christmas dinner this year! I'm making a standing rib roast as the star of the meal, and with a beauty like that on the table you have to make sure the rest of the table is set properly and correctly. Here's a wonderful guide I found on With Style & Grace. This diagram shows you where every fork, spoon, plate, glass and all other details should be placed, along with how much space to leave when setting the table. We'll share a photo of our finished holiday dinner table....feel free to share yours with us, too!


12 Days of DIY :: Day 6 :: Rock Candy Cone Trees

Here's another beautiful and creative way to use candy in your holiday decor! Last year we did a peppermint candy cone that turned out wonderful, and here's another candy cone tree idea we found on Somewhere Splendid. This project is pretty simple really, and by using rock candy you can find just about any color you want! The finished product looks gorgeous (and delicious)!


Supplies:
  • floral cone forms in varying heights
  • rock candy crystals in three or more colors
  • hot glue
  • solid text weight paper in your lightest hue
  • spray adhesive
  • cookie sheet
Instructions:

With the cookie sheet turned horizontally, pour your rock candy across the surface in a long line. The darkest color of rock candy should be at the bottom of the cookie sheet. The row of candy above your first should be slightly lighter than and flush with the previous row. Repeat this process, ending with the lightest shade of candy on the top row. Set aside.

Turn the paper to a landscape orientation and wrap around each cone. Slightly overlap the paper in the back of the cone and secure using hot glue. Do not apply hot glue directly to the cone, it will melt. Trim excess paper at the bottom of the cone. You may need two sheets of paper to cover each cone. If so, overlap the two sheets slightly to avoid a gap of Styrofoam peeking through.

Working quickly, spray the cone with the spray adhesive, and roll it through the rock candy to completely cover it with gradients of sugary color. Allow cone to dry before re-spraying or re-rolling. You can also use hot glue to fill in any empty spots.

Once your cones are finished, you’re ready to decorate your mantle or tabletop with a yummy collection of candy coated trees. 

See the original post on Somewhere Splendid!

Saturday, December 18, 2010

12 Days of DIY :: Day 5 :: Victorian Holiday Wreath Centerpiece

This DIY project found on Elizabeth Ann Designs is great for everyone from beginner to expert. The centerpiece can be a wonderful addition to your dining room table at home, or several can be made for holiday party or wedding centerpieces. For such few supplies, the finished product is absolutely gorgeous!


Supplies needed (for basic centerpiece – see printable version for each skill level):
  • (3) varying height (but same diameter) cylinders (Crate and Barrel sells the perfect ones for about $10 for all 3 pieces)
  • 12” grapevine wreath
  • 12” charger plate
  • (1-2) bags of fresh cranberries
  • (3) Floating candles (make sure they are smaller diameter than your vases)
  • (1-2) boxes of assorted glass ornaments
  • Kiwi branches
  • Water


 Directions (for basic centerpiece – see printable version for each skill level):
  1. To give your wreath more texture and dimension, add some kiwi branches by weaving them into the grapevine
  2. Center the wreath on top of the charger plate
  3. Place the 3 cylinder vases in the center of the wreath on the charger plate
  4. Fill the vases with 1-2 handfuls of fresh cranberries
  5. Fill the vases with water leaving 1.5-2 inches of space from the top
  6. Add your floating candles on top of the cranberries (if you added too much water, remove it with a turkey baster—do not get the candlewick wet or it will not light!)
  7. Fill the gaps around the vases the middle of the wreath with assorted glass holiday ornaments


For printable step-by-step instructions and images (including a basic, upgraded, and advanced version for all skill levels!), click here.

Friday, December 17, 2010

12 Days of DIY :: Day 4 :: "Believe" Banner

I love hanging banners for the holidays! This "Believe" banner is easy to put together and perfect to hang on any wall, mantle or even a high doorway. I found templates and instructions on the At Second Street blog. (Links are below the photos)...


Click here for the printable letter templates
Click here for instructions on hanging the banner

Thursday, December 16, 2010

Fox 8 Hot List Winner

It was announced today that Amy Nixon Events won 1st place in this year's Cleveland Fox 8 Hot List! Thank you to everyone who supported us by voting! Clients, vendors, businesses and friends all stepped up for us in this year's contest, and we're so appreciative of the support and love! Congratulations to all the other winners and nominees!


12 Days of DIY :: Day 3 :: Hot Cocoa Ornament Favors

This hot cocoa ornament DIY project is a great idea for holiday parties or weddings. You can give them as favors to your guests, and they double as decor as well! Or, you can put them on your tree at home and ask friends to take one home when they visit you. Either way, this DIY project from Project Wedding is too cute to pass up!


12 Days of DIY :: Day 2 :: Balsa Wood Mini Tree

This DIY project is perfect for those in apartments (or other small spaces) where bringing in a full size Christmas tree just doesn't work. I know I've lived in a few apartments in my day that I lovingly refer to as "shoeboxes", and I was always a little down at Christmas because I couldn't have a tree. This neat little project from Design*Sponge is the DIY solution to that problem!


Materials:
  • 4 – 6 sheets of  1/32″ x 3″ x 36″ balsa wood (this should be available at craft, art, and hobby shops)
  • pencil
  • exacto/utility knife with sharp blade
  • cutting mat
  • hot glue gun and hot glue sticks
  • 3/8″ thick dowel 20″ long
  • hole punch tool (these are available at craft and art supply stores)
  • hammer
  • ruler
  • birch log slice (or any wood circle or block that has a bit of weight and a flat surface)
  • 2″ nail
  • drill with 3/8″ boring bit (optional)
  • tree limb templates (feel free to enlarge for a bigger tree. at 100% these templates will make a tree 11″ wide and about 20″ tall)
  • template 1
  • template 2
  • template 3


Get the full instructions and more photos at Design*Sponge

Tuesday, December 14, 2010

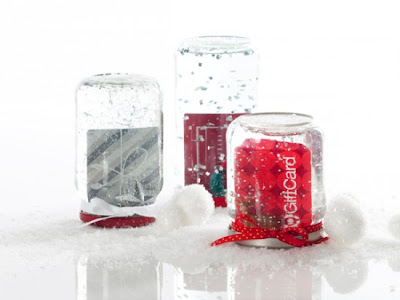
12 Days of DIY :: Day 1 :: Gift Card Snow Globe

Today begins our 12 Days of Christmas DIY series! Last year we did a DIY project every day for 12 days leading up to Christmas, and it was loads of fun! This year we decided to take on the 12 day project again!

Our first project we found on One Charming Party....it's so easy, yet so creative! I never want to give gift cards for Christmas (even though they're a fabulous idea) just because they're so small and un-wrappable....and when you hand over the envelope, everyone knows what's inside! With this cool snow globe project you can wrap the globe in a box, hand over the wrapped gift, and they will be none the wiser! Not to mention, you can jazz them up with personality and they're really beautiful!


Supplies: 
A jar with a lid (we used empty salsa and olive jars), a gift card, a small embellishment (we bought ours at a local craft store), a hot glue gun, glitter, some ribbon and water.

How To:
1. Wash the lid and jar. Remove any stickers.
2. Spray paint the jar lid if you would like a different colored lid.
3. Glue a thick line of hot glue onto the base of the gift card. Stick it to the inside of the lid.
4. Glue the embellishment onto the inside of the lid, in front of the gift card. Let the glue set for an hour.
5. Add some glitter to the jar and fill with water.
6. Tightly screw the lid back onto the jar.
7. Tie a ribbon around the base of the jar, if desired.

NOTE: *We tested these gift cards after a week and they still worked. However, we don’t recommend leaving the gift cards in the water longer than a week.

Visit One Charming Party for the full post and photo credits.
Related Posts Plugin for WordPress, Blogger...